That's me, all right.
I've made a space just for all my sewing, DIY and design related posts. It's called Loveless Arachne - which also happens to be the name of the shop on Etsy I'll be opening in a few weeks, depending on how everything comes together in the next little while.
So I've been pushing myself and working out some new designs, while steadily and gradually building up stock to put in the shop. I don't intend to list a lot of things right away, but a few items at a time and we'll see how it goes. The first few things I intend to post are all things I worked out over last summer -- the Jellyfish will definitely be a part of this (not so much the Alot of Cake!)
I'm hoping that once I get a few items made up, I can perhaps get a few friends to help me model/take pictures of all my stuff. I really really want to try and keep them classy and more to the editorial and artistic side of things. I love editorial photography, and really want to use live models whenever I can - I think it just adds something. If I can't coerce my friends to do it with my charming zealotry for this project, perhaps I can bribe them (free swag, anyone?) Don't worry, friends who read my blog, I will of course ask/beg you in person when I'm prepared for this step, I'm just honestly really excited for it.
There are a lot of other things to do, of course. But for now the blog is up, and that's a start! ;)

Showing posts with label design. Show all posts
Showing posts with label design. Show all posts
Tuesday, 28 February 2012

Wednesday, 19 October 2011
Pita Chips and Hummus, Let's Be Friends FOREVER. Until I Eat You.
So I'm sitting here, eating my yummy lunch of pita chips, hummus and Italian wedding soup thinking how ridiculous it is that the whole bag of mini-pitas I bought was $1.75, and how quick they toast up and make the equivalent of $5.00 worth of a bag of pita chips. Being fugal has never been more delicious. And it's probably healthier too. That being said, I've been thinking about other things than delicious frugality today, the main thing being branding.
Frankly, I'm at a bit of a loss. I'm trying to work on this whole business plan thing for getting my designs out there to sell and making a name for myself, a brand. And right now, my working business name is ... horrible. I hate it. It's so... cute. I mean, it sounds like a company that makes jewellery in a small town and sells it at a gift shop. Which is, ironically, exactly what I'm currently doing but that's not the point! I want a name that will grow with my designs, and that feels accessible to the people I design for. Right now, the only saleable pieces I have are my Jellyfish earrings, which are fun and whimsical, and the current name I'm using for my "company" -- Little Biggs Designs -- suits them in a silly girly way. But what about when I start getting some saleable pieces of say, the Cream Soda Shorts? Or the Wrap Skirt? Little Biggs Designs is just not a name that speaks to me, and I don't think it speaks to my customers either.
I've been thinking a lot about my client, who I am designing for. And honestly, my niche is in the semi-geeky quirky girl, the kind of woman who cares about her appearance, but doesn't give a shit about what's "on trend" exactly. She's the kind of girl who would wear a corset as street wear, who wears retro head phones while listening to classic rock, who paints her nails to glam up her look, and then lets them chip away rather than removing it. It might be said her style is a little laissez-faire, and layers are her friend. She loves piercings, and tattoos, yet would still gleefully raid her grandmothers closet for vintage pieces of awesome. My client loves the idea of reclaimed clothing, and organic cloth, but will still wear polyester if it's rad enough. She also says rad. And she is a living rainbow.
Then it occurred to me, I am designing for myself.
And I'm a bit of a hipster, aren't I?
But anyway, after thinking a lot about that, I'm trying to come up with something that speaks to me on a few different levels. I've been getting a lot of ideas from people in my life, well input more than ideas. A lot of the input has been helpful in finding a direction, but some of it is derailing me. And now I'm a little stuck. A friend of mine who works in web design and print design gave me a few pointers on dealing with the internet, and how I want to make my business name something Google searchable, related to the product I'm selling. His exact example was "if someone is looking for edgy awesome earrings, and they Google that the first thing Google will pull up is EdgyAwesome Designs giving it most points for relating to the search." My current business name will not come up in that search, unless I inundate the site itself with text that says "Edgy" and "Awesome" all over it. Which I am not adverse to doing.
Right now, I'm stuck on one idea I'm particularly fond of, but it has nothing to do with anything I've made. But it sounds artsy and I kind of like it.
Maybe I should just call my business Terribly Titled too, because I apparently am no good at titles...
Frankly, I'm at a bit of a loss. I'm trying to work on this whole business plan thing for getting my designs out there to sell and making a name for myself, a brand. And right now, my working business name is ... horrible. I hate it. It's so... cute. I mean, it sounds like a company that makes jewellery in a small town and sells it at a gift shop. Which is, ironically, exactly what I'm currently doing but that's not the point! I want a name that will grow with my designs, and that feels accessible to the people I design for. Right now, the only saleable pieces I have are my Jellyfish earrings, which are fun and whimsical, and the current name I'm using for my "company" -- Little Biggs Designs -- suits them in a silly girly way. But what about when I start getting some saleable pieces of say, the Cream Soda Shorts? Or the Wrap Skirt? Little Biggs Designs is just not a name that speaks to me, and I don't think it speaks to my customers either.
I've been thinking a lot about my client, who I am designing for. And honestly, my niche is in the semi-geeky quirky girl, the kind of woman who cares about her appearance, but doesn't give a shit about what's "on trend" exactly. She's the kind of girl who would wear a corset as street wear, who wears retro head phones while listening to classic rock, who paints her nails to glam up her look, and then lets them chip away rather than removing it. It might be said her style is a little laissez-faire, and layers are her friend. She loves piercings, and tattoos, yet would still gleefully raid her grandmothers closet for vintage pieces of awesome. My client loves the idea of reclaimed clothing, and organic cloth, but will still wear polyester if it's rad enough. She also says rad. And she is a living rainbow.
Then it occurred to me, I am designing for myself.
And I'm a bit of a hipster, aren't I?
But anyway, after thinking a lot about that, I'm trying to come up with something that speaks to me on a few different levels. I've been getting a lot of ideas from people in my life, well input more than ideas. A lot of the input has been helpful in finding a direction, but some of it is derailing me. And now I'm a little stuck. A friend of mine who works in web design and print design gave me a few pointers on dealing with the internet, and how I want to make my business name something Google searchable, related to the product I'm selling. His exact example was "if someone is looking for edgy awesome earrings, and they Google that the first thing Google will pull up is EdgyAwesome Designs giving it most points for relating to the search." My current business name will not come up in that search, unless I inundate the site itself with text that says "Edgy" and "Awesome" all over it. Which I am not adverse to doing.
Right now, I'm stuck on one idea I'm particularly fond of, but it has nothing to do with anything I've made. But it sounds artsy and I kind of like it.
Maybe I should just call my business Terribly Titled too, because I apparently am no good at titles...
Friday, 29 July 2011
Thought I'd make a Tutorial.
'Cept I didn't really take enough pictures for that. Not a picture tutorial anyway. So instead I'll just post a few of my work in progress pics for the Cream-Soda Shorts Mach 2: Castaway Marianne. And I'll include verbal instructions on how I made it work. If anyone who reads this wants a copy of the pattern, let me know on facebook or twitter and I will scan the pattern in so you can print it off of your computer and you can give it a whirl to make your own Cream-Soda Shorts.
 These are the materials I started with. 2 meters of the navy fabric, which was way more than I needed but it was in the bargain bin so better safe with the extra than needing it and not having it. 1 meter of heavyweight iron on interfacing, and one spool of navy thread and one of white top stitching thread for the detail work.
 I cut all the pattern pieces out, and didn't take a picture. 2 pieces of the back of the shorts, 2 pieces for the front, two pieces for the back waistband and one of the front waistband, and eight placket pieces. I had to cut these out in such a way to match up the lines of the corduroy fabric. Then I cut out the iron on interfacing for the back waistband, front waistband, and placket pieces, and ironed them on. Next time I do this I'm going to cut the interfacing pieces without the seam allowance to make it easier to sew.

 I then marked the placket cut line and the darts in the back piece. I reinforced the front placket area before cutting it with a wide machine stitch, and sewed in the darts for the back. I ironed the darts flat and facing the back seam once the shorts were mostly assembled. I did not trim the darts, as I was using them for part of the detail top stitch later.
 I then sewed the shorts front and back together, starting at the inside seams, front piece to back piece. Then I sewed the inseams together, matching front to front right sides together and back to back right sides together, and then I stitched the sides together. I didn't take pictures of all of this, but I did take one after. See?

 The plackets are probably the trickiest part. First I cut the line for the plackets on the shorts front. Then I pinned the plackets together, right sides together, and sewed two along the inside curve and over the placket points, and two along the oustide curve and over the placket points. This creates the two shapes for the inside plackets and the outside plackets.

I then trimmed them down very close to the edge and sniped the corners and turned the plackets right side out. I used a pin to pull the corners out to make them nice and pointy looking.

Then was the fun and slightly more confusing part. This took me a few minutes to work out. For the outside plackets which in the end will have the button holes, I had to open one of the placket pieces that had been sewn along the inside curve and match the outside curve's right side to the wrong side of the shorts front. You have to really manipulate the fabric to get the two sides to match without twisting or pulling, because the curves are not the same, but when you flip it over it gives you the right shape. It would have been so much easier if I left the plackets straight and not curved at all. But I love to make things more difficult for myself.

Then I sewed the placket on from the inside, even though I pinned the outside of the fabric. It was easier to manipulate the not interfaced shorts front, which is why I did it this way. Kenny doesn't like sewing over pins, but he didn't get too caught up on them this time. I took the sewing right to the corner of the point, and made sure to really reinforce this by backstitching. Then I trimmed the excess fabric and flipped the placket over and ironed it so it had a nice fold over the outside of the fabric.

I hand stitched this down with a slip stitch to secure it, and I hand stitched down the point of the placket to give me a guide line on the other side to create the inside placket where the buttons go.
The inside plackets got tricksy, and I was so intent on making them line up nicely that I forgot to take pictures. First I realised I had to cut some extra fabric out near the point to make sure they would sit flat and the points would line up. I did this by taking the inside placket and pining the point to where it was directly under the point of the outside placket, and then pinning the tops together. I traced a line on the shorts front matching the inside curve of this placket. I then cut along this new line. I know, writing it out doesn't make a lot of sense if you can't see what I'm talking about, and I appologize. Anyway, I matched them up as described, and then, using the same technique as the outside placket I created the inside one, sewing the open inside curve to the fabric front, matching the right side of the placket to the wrong side of the shorts front. I ironed it, and then hand stitched it down. Then I did it all over again for the other placket on the other side.
At this point I top stitched each placket, starting with the inside placket I stitched very close to the edges using a decorative stitch on my friend's sewing machine that she let me borrow. Then I did the front plackets, then I sewed down the points. I also top stitched down the darts in the back, and the side seams.
The fly of theses shorts then becomes a front flap that if you unbutton both sides just falls down. You only really have to undo one side to slide the shorts on.
 Then I did the waistband pieces. First I sewed the back waistband pieces together at the back seam, and ironed them in half, wrong sides together. I wasn't thinking clearly when I made the back waistband pieces, and it wound up creating an interesting V shape. I decided I liked it so I kept it. Then I flipped the fabric so the right sides were together and I sewed them with a 4/8" seam, trimmed it and clipped the corners. Then I flipped it right side out, and pulled the corners out with a pin to create the nice square edges. Then I matched the back seam of the shorts to the back seam of the waistband, and pinned it together with the right side of the waistband to the wrong side of the shorts. I sewed it down, flipped it and ironed it. I could have at this point hand stitched the waistband down, but that seemed like too much work. So instead I just made sure it was very securly pinned and I top stitched it down using the white top stitching thread. I sewed all the way around the waist band, so it had the pop of white detail. On the front waistband piece, which is much smaller than the back, I ironed the thing wrong sides together, then I flipped it over right sides together and using a 4/8" seam allowance I stitched it up. Then I trimmed and flipped it, pinned it right side to wrong side of the shorts front, and sewed along the seam. I trimmed it, flipped it and ironed it. Then I hand stitched it down and then topstitched around the edges.
 Wow! So close to completion! Lastly, I measured out my button holes and very carefully this time created them. On the first version of the shorts I grew very impatient, and wound up making a lot of mistakes on the button holes. This time I was extra careful to make them evenly spaced and straight on the placket flys. I only had four buttons for each side as apposed to the original shorts which had 5. Once I had the button holes sewn in, I trimmed out the insides and marked where the buttons needed to go, which was very close to the edge of the inside plackets to make sure they didn't pull funny. Then I hand sewed all the buttons into place.
THEY ARE NOW SHORTS! I steamed them with my iron (yaay I got the steamer to work again!) And they were DONE!

It took me 2 days of sewing for about 4 hours to complete the Marianne shorts.
Yesterday I bought some very awesome printed satins to make a skirt with, and a lovely silky-touch lining fabric to line the steam punk jacket I`ve been dreaming of making for awhile now. But I think the skirt is going to be super easy, and I wont need the jacket until the fall, so I`m going to make the skirt first.
 These are the materials I started with. 2 meters of the navy fabric, which was way more than I needed but it was in the bargain bin so better safe with the extra than needing it and not having it. 1 meter of heavyweight iron on interfacing, and one spool of navy thread and one of white top stitching thread for the detail work.

 I then marked the placket cut line and the darts in the back piece. I reinforced the front placket area before cutting it with a wide machine stitch, and sewed in the darts for the back. I ironed the darts flat and facing the back seam once the shorts were mostly assembled. I did not trim the darts, as I was using them for part of the detail top stitch later.

 The plackets are probably the trickiest part. First I cut the line for the plackets on the shorts front. Then I pinned the plackets together, right sides together, and sewed two along the inside curve and over the placket points, and two along the oustide curve and over the placket points. This creates the two shapes for the inside plackets and the outside plackets.
I then trimmed them down very close to the edge and sniped the corners and turned the plackets right side out. I used a pin to pull the corners out to make them nice and pointy looking.

Then was the fun and slightly more confusing part. This took me a few minutes to work out. For the outside plackets which in the end will have the button holes, I had to open one of the placket pieces that had been sewn along the inside curve and match the outside curve's right side to the wrong side of the shorts front. You have to really manipulate the fabric to get the two sides to match without twisting or pulling, because the curves are not the same, but when you flip it over it gives you the right shape. It would have been so much easier if I left the plackets straight and not curved at all. But I love to make things more difficult for myself.
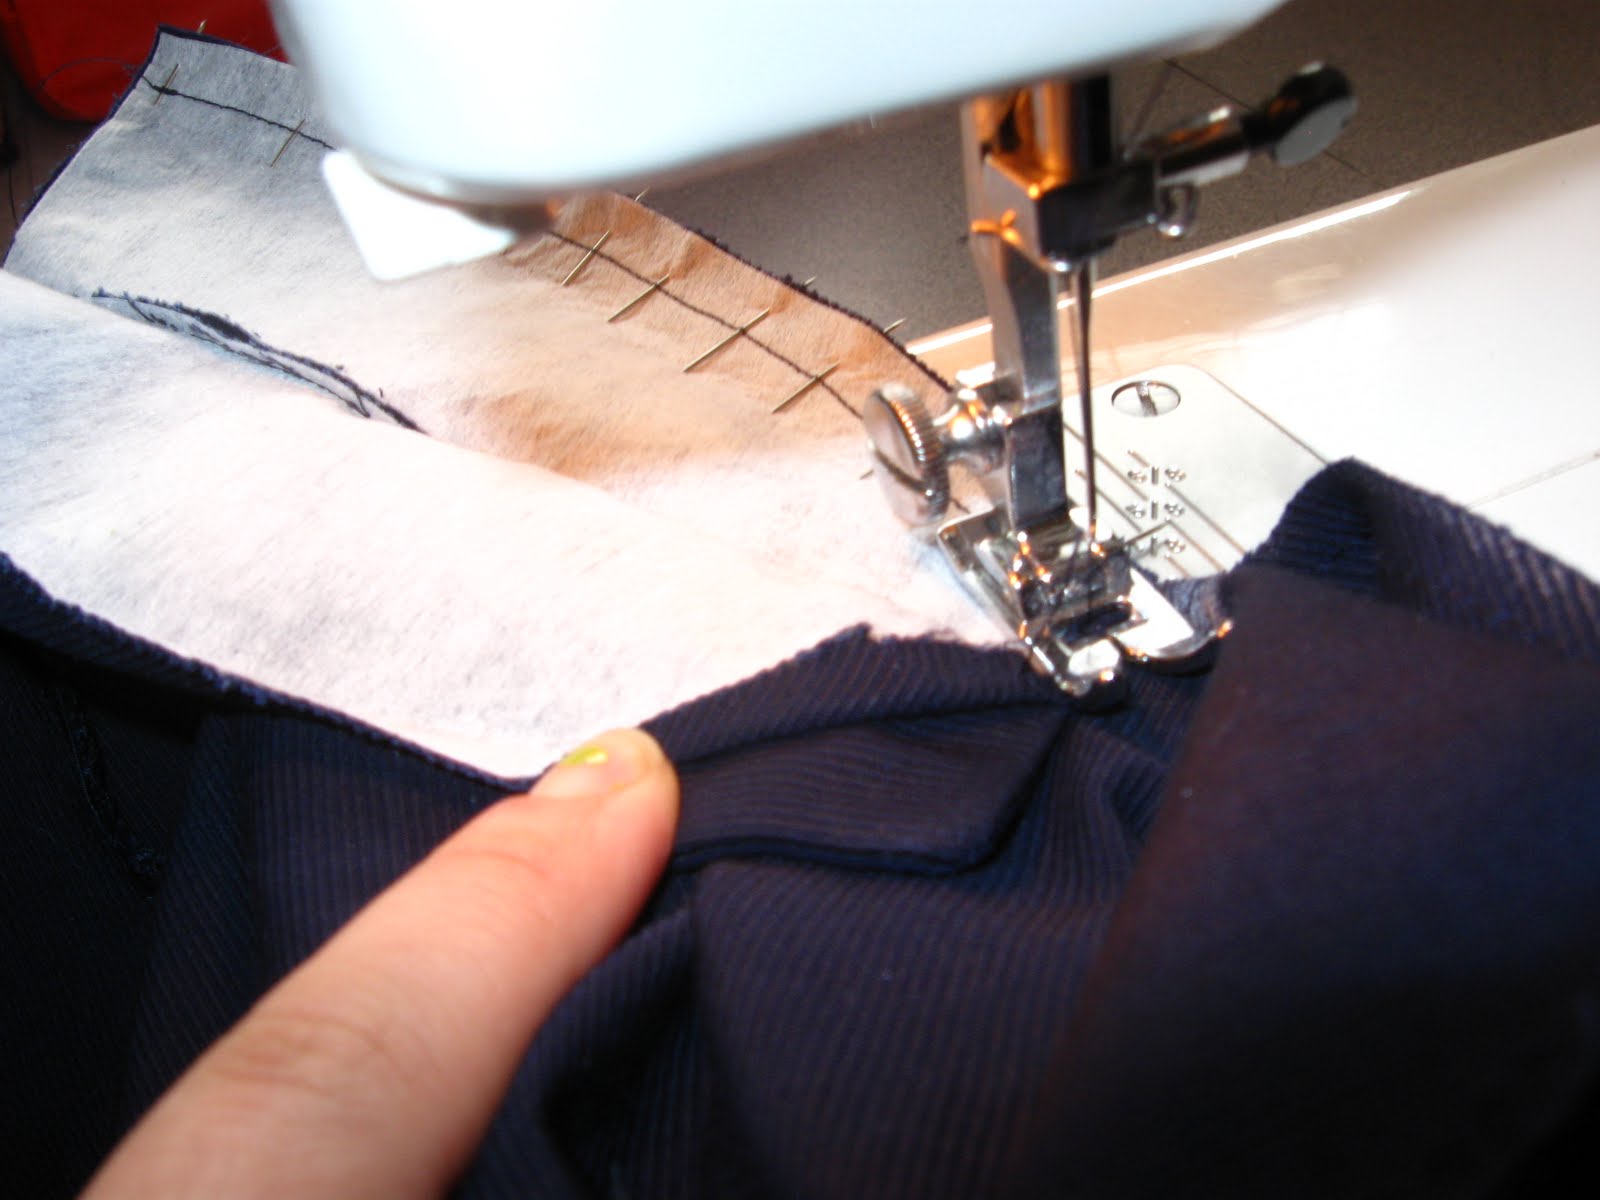
Then I sewed the placket on from the inside, even though I pinned the outside of the fabric. It was easier to manipulate the not interfaced shorts front, which is why I did it this way. Kenny doesn't like sewing over pins, but he didn't get too caught up on them this time. I took the sewing right to the corner of the point, and made sure to really reinforce this by backstitching. Then I trimmed the excess fabric and flipped the placket over and ironed it so it had a nice fold over the outside of the fabric.

I hand stitched this down with a slip stitch to secure it, and I hand stitched down the point of the placket to give me a guide line on the other side to create the inside placket where the buttons go.
The inside plackets got tricksy, and I was so intent on making them line up nicely that I forgot to take pictures. First I realised I had to cut some extra fabric out near the point to make sure they would sit flat and the points would line up. I did this by taking the inside placket and pining the point to where it was directly under the point of the outside placket, and then pinning the tops together. I traced a line on the shorts front matching the inside curve of this placket. I then cut along this new line. I know, writing it out doesn't make a lot of sense if you can't see what I'm talking about, and I appologize. Anyway, I matched them up as described, and then, using the same technique as the outside placket I created the inside one, sewing the open inside curve to the fabric front, matching the right side of the placket to the wrong side of the shorts front. I ironed it, and then hand stitched it down. Then I did it all over again for the other placket on the other side.
At this point I top stitched each placket, starting with the inside placket I stitched very close to the edges using a decorative stitch on my friend's sewing machine that she let me borrow. Then I did the front plackets, then I sewed down the points. I also top stitched down the darts in the back, and the side seams.
The fly of theses shorts then becomes a front flap that if you unbutton both sides just falls down. You only really have to undo one side to slide the shorts on.

 Wow! So close to completion! Lastly, I measured out my button holes and very carefully this time created them. On the first version of the shorts I grew very impatient, and wound up making a lot of mistakes on the button holes. This time I was extra careful to make them evenly spaced and straight on the placket flys. I only had four buttons for each side as apposed to the original shorts which had 5. Once I had the button holes sewn in, I trimmed out the insides and marked where the buttons needed to go, which was very close to the edge of the inside plackets to make sure they didn't pull funny. Then I hand sewed all the buttons into place.
THEY ARE NOW SHORTS! I steamed them with my iron (yaay I got the steamer to work again!) And they were DONE!

It took me 2 days of sewing for about 4 hours to complete the Marianne shorts.
Yesterday I bought some very awesome printed satins to make a skirt with, and a lovely silky-touch lining fabric to line the steam punk jacket I`ve been dreaming of making for awhile now. But I think the skirt is going to be super easy, and I wont need the jacket until the fall, so I`m going to make the skirt first.
Subscribe to:
Posts (Atom)